Welcome to Project Knitway or should I say Project Renottaway? It's my cyberspace place to post my favorite things...thoughts about family and creativity and design. One of my favorite things is making stuff, specifically clothing and accessories from fiber and metal. So you'll see a lot about that here. I also love spending time with my family, so there will be a bit about that too. When I'm not with my family or in my studio, I am most likely at nextdoor, my store. I have always had a store ever since I was a young woman. I started with a weaving store called the niddy noddy in Waukesha eons ago. I ended with nextdoor in Brookfield. It's my dream store filled with great clothing, especially denim. Really nice women work and shop there, it's a fun place to be. You can find us there every day and online at www.shopatnextdoor.com So come for a visit here and there.
Wednesday, February 22, 2012
Shady Lane
Most of the year nature provides all the "window shades" I need in my studio. However, during the winter months some of the windows are exposed more than I like. I've thought of purchasing window blinds but I really didn't want the expense or the permanency of them. I finally came up with a solution that was very simple, versatile and affordable.
I purchased some cotton duck fabric from my local store for $6.00 a yard. It was 60 inches wide so I was able to get 3 - 20 inch panels out of 2 yards, making the cost of each panel $4.00. I hemmed them to fit my window and then sewed 2 velcro tabs to the top back corners. I cut 2 velcro tabs with the sticky backs and applied those to my window. Then i simply hung the panels, no expensive hardware and no messy installation. It was the perfect solution. I can take them down when the greenery is back this spring. I was planning to print or stitch on the panels but I'm enjoying nature's design on them right now.
This has so many applications. The panels could be made out of fun print fabrics. It would so cute in a child's room with appliqued cloth photos sewn on (see my blog on Jet Set). And what about that first apartment with an unsightly view or a dorm room that needs fixing up? There are so many possibilities! Have some fun and make something.
Renotta
Tuesday, February 7, 2012
In the Bag
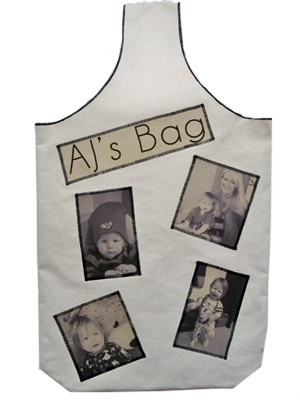
I am really having fun with photo printing on fabric! Made this bag for AJ to take to "school". It's big and roomy enough for all the necessaries, including blankie.
love,
Grannie
love,
Grannie
Monday, February 6, 2012
Pass the Envelope Please
Did I mention I love pillows and that I love to make them. But I hate putting a zipper in. So when I discovered the envelope pillow it was a perfect match for me. Start with a few yards of fabric. I love muslin because it has a hand woven feel and is very affordable.
Step 1: cut a piece of fabric the size of your desired pillow. Mine is 24" by 24". I appliquéd two ink jet printed pieces on to make the pillow top more interesting.
Step 2: Cut 2 pieces of muslin 24" by 18". Hem one right and one left side of each piece along the 24"edge.
Step 3: Lay these pieces right side together onto the pillow top piece and stitch along all 4 sides.
Step 6: Sit back and enjoy. Cost to make: 2 hours of your time and $10. Looks like a million.
Step 1: cut a piece of fabric the size of your desired pillow. Mine is 24" by 24". I appliquéd two ink jet printed pieces on to make the pillow top more interesting.
Step 2: Cut 2 pieces of muslin 24" by 18". Hem one right and one left side of each piece along the 24"edge.
Step 3: Lay these pieces right side together onto the pillow top piece and stitch along all 4 sides.
Step 4: Turn the pillow cover right side out and press. Sometimes I like to top stitch 1/4" along the edge of the piece. It gives the look of a piping and adds a nice touch.
Step 5: Pass the Stuffing Please. You can buy pillow inserts at your local fabric store, but I prefer to make mine. It's quick and easy and inexpensive. You can also get a very nice, plump looking pillow, any size you prefer. Start by sewing a simple pillow sack the same size as your finished pillow top, or even a bit larger. Leave an opening about 6 to 8", large enough to add the stuffing. Add lots of stuffing and spread it evenly into the corners and throughout the sack. Sew up the opening and insert into your pillow top.
Saturday, February 4, 2012
Pillow Talk
I love pillows! Anytime I feel the need to redecorate, the first thing I do is change out my pillows. Sometimes I buy them, but most of the time I make them. It's creative and cost effective, all you need is a few yards of fabric and a bag of stuffing. Lately I have been creating my own "fabric" by adding fabric photos printed on my ink jet printer (refer back to my last blog called Jet Set). It's simple and so much fun. You can print any image onto a piece of fabric and stitch it down to a background piece. Here are a few examples.
![]() |
| I did these for Baby AJ's room. I was thinking how much fun it would be to scan one of his first drawings and make it into a pillow. |
![]() |
| Bobcat was done for a friend in Tucson, who took this photo of a bobcat out in her garden. |
![]() |
| Cat Nap for my friend Ann. |
![]() |
| Leaves of Grass...a fabric photo of a scanned leaf image appliquéd down with stitching continuing the design. |
I'm a big believer in simplicity when it comes to making things and this includes pillows. I like envelope pillows because you can remove the cover from the pillow insert easily. No zippers or closures are required, yet the end result is very professional. In my next blog I'll show you step by step how to do this.
Stay tuned, stick to your knitting and make something today!
Renotta
Wednesday, February 1, 2012
Jet Set
We made it through January here in Wisconsin. It was brutal, but not as bad as other years. Snow fall was minimal, we have yet to have "the big one", the blizzard of 2012. Actually we always enjoy at least one great storm where staying in is your only option while Mother Nature has her way. I always feel like making things in February. Last year at this time I was winding up my "one a day" blog where I created and posted something I made everyday for a year. It was a great challenge that I was happy to be done with, but one that generated lots of ideas. One of my favorite projects that came out of the blog involves printing on fabric with your ink jet printer. It's nothing new, quilters have been doing it for years, but most crafters know nothing about it. Besides being a very creative technique, it is very easy, inexpensive and versatile. All you need are a few basic supplies and an inexpensive ink jet printer, which you no doubt already have.
Supplies Include:
1. A few yards of fabric, natural in color and fiber content. Light weight muslin, linen, silk and blends work well and are available at your local fabric store.
2. A roll of freezer paper from your grocery store.
3. A bottle of Bubble Jet 2000 solution found on line at http://www.dharmatrading.com/cgi-bin/search.cgi?query=bubble+jet
4. Some basic sewing tools like a rotary cutters, scissors, a simple sewing machine (nice to have, but you can get by with needle and thread), a good iron etc.
5. An iron on fusible that fuses fabric to fabric, handy to have and available at your local fabric store.
6. A simple ink jet printer/scanner. I like Canon and Epson.
7. A few hours in your work space, preferably during a snowstorm!
Step 1: Basically you are going to be preparing sheets of fabric for your printer, 8.5" by 11". I start by cutting my fabric in strips about 13"high by whatever the width of the fabric is. I soak these strips in the Bubble Jet Solution following the instructions and hang them to dry.
Step 2: In the meantime I cut my freezer paper into pieces 8.5 X 11.
Step 3: After the fabric has dried, iron on the freezer paper and cut the fabric to fit.
Step 4: The fun begins. You are ready to print. Select a photo or design and place it in your scanner. Put the fabric-paper, one sheet at a time, in your printer and print. You will end up with your image printed on the fabric.
Step 5: Gently peel off the freezer paper. Save the sheet of freezer paper as you can reuse it. Let your fabric sit and cure for awhile.
Step 5: Unleash your creative spirit. The fabric image I show above was taken from a photo of a monarch butterfly in my garden. I printed it and then "framed" it in fabric and stretched it on an antique frame. It is transparent and looks lovely sitting in my window on a cold winter's day.
This is just the tip of the iceberg. There are so many possibilities for this technique...pillows, table runners, window shades, photo albums, note cards etc. I'll be back with more ideas and examples. Stay tuned, create something and stick to your knitting.
Renotta
Supplies Include:
1. A few yards of fabric, natural in color and fiber content. Light weight muslin, linen, silk and blends work well and are available at your local fabric store.
2. A roll of freezer paper from your grocery store.
3. A bottle of Bubble Jet 2000 solution found on line at http://www.dharmatrading.com/cgi-bin/search.cgi?query=bubble+jet
4. Some basic sewing tools like a rotary cutters, scissors, a simple sewing machine (nice to have, but you can get by with needle and thread), a good iron etc.
5. An iron on fusible that fuses fabric to fabric, handy to have and available at your local fabric store.
6. A simple ink jet printer/scanner. I like Canon and Epson.
7. A few hours in your work space, preferably during a snowstorm!
Step 1: Basically you are going to be preparing sheets of fabric for your printer, 8.5" by 11". I start by cutting my fabric in strips about 13"high by whatever the width of the fabric is. I soak these strips in the Bubble Jet Solution following the instructions and hang them to dry.
Step 2: In the meantime I cut my freezer paper into pieces 8.5 X 11.
Step 3: After the fabric has dried, iron on the freezer paper and cut the fabric to fit.
Step 4: The fun begins. You are ready to print. Select a photo or design and place it in your scanner. Put the fabric-paper, one sheet at a time, in your printer and print. You will end up with your image printed on the fabric.
Step 5: Gently peel off the freezer paper. Save the sheet of freezer paper as you can reuse it. Let your fabric sit and cure for awhile.
Step 5: Unleash your creative spirit. The fabric image I show above was taken from a photo of a monarch butterfly in my garden. I printed it and then "framed" it in fabric and stretched it on an antique frame. It is transparent and looks lovely sitting in my window on a cold winter's day.
This is just the tip of the iceberg. There are so many possibilities for this technique...pillows, table runners, window shades, photo albums, note cards etc. I'll be back with more ideas and examples. Stay tuned, create something and stick to your knitting.
Renotta
Sunday, December 25, 2011
Merry Christmas
It is Christmas Day and everything is calm and beautiful. I made it through the busy month at nextdoor and headed for the north woods with my husband and dogs. We're enjoying a quiet and relaxing old fashioned Christmas with hand made gifts and thoughtful acts. Since my husband's birthday is on the 23rd, we always celebrate for three days with lots of good food and good cheer. I thought I'd share some of our gifts and projects with you as my year end post. I start off the holiday season in our home at Thanksgiving time with decorations and a tree. By time Christmas arrives I have enjoyed a month of holiday decor and am ready to leave it behind should we leave home for Christmas. This year though I mentioned that I would miss our little tree, so when we arrived at our cabin this was waiting for me...
Every trip up here we're packed to the hilt with "stuff" from home, this year being no exception. Santa was very agreeable to letting me fill the car with artifacts so I could continue to decorate our cabin. He even gamely stopped at pier 1 in the middle of a snowstorm on the way there. It's amazing how one little purchase can change a space and keep this elf happy.
This lovely little fern painting was just what I was looking for.
So as you can see, we had a down home kind of holiday. It was perfect. One last "homemade" gift I'd like to share with you was for AJ. I started this cloth photo album for him when he was born and finally got around to putting it together. I love the fact that you can print on fabric with your ink jet printer. It's nothing new to quilters, but for the rest of us it seems revolutionary. There are so many fun projects not involving complex techniques and equipment that you can do at home. I'll be sharing these with you in 2012, but in the meantime, just wanted you to see the book.
Happy New Year. Hope you make a resolution to make something in 2012!
Renotta
![]() |
| Score one for Santa! |
![]() |
| Score two for Santa |
So by now you're no doubt wondering what is Santa getting for Christmas? Well, that is always a challenge for the man who says he doesn't want or need a thing. But this little elf had a few tricks up her sleeve, starting with a remote! I proudly produced the long lost remote for the tv so Santa could happily surf from his favorite chair. Also lovingly delivered champagne and well lit fires are a nice touch, as are collage photos framed for this nostalgic Santa. Love photoshop elements!
So as you can see, we had a down home kind of holiday. It was perfect. One last "homemade" gift I'd like to share with you was for AJ. I started this cloth photo album for him when he was born and finally got around to putting it together. I love the fact that you can print on fabric with your ink jet printer. It's nothing new to quilters, but for the rest of us it seems revolutionary. There are so many fun projects not involving complex techniques and equipment that you can do at home. I'll be sharing these with you in 2012, but in the meantime, just wanted you to see the book.
Happy New Year. Hope you make a resolution to make something in 2012!
Renotta
Friday, December 2, 2011
Thank You 30 West!
Today my blog project is a blog project. Lots of people ask me about my studio where I design and work. Up until recently I haven't shown it to anyone outside family and friends, but with this lovely article by 30 West on my scarves for shelter and Project Knitway I decided to share my favorite place with everyone. So I spent a lot of time taking photos and putting them together in photoshop. Then I started yet another blog, RRT Designs and posted it all for you to see. It's a work in progress so I hope you'll come back often for a visit. My next venture is a page on my nextdoor website that features some of my favorite things I make in my studio. It's called Shop What's Next, also a work in progress. In the meantime here's the 30 West Article.
http://www.shopatnextdoor.com/ecommerce/project-knitway.html
Subscribe to:
Posts (Atom)