Welcome to Project Knitway or should I say Project Renottaway? It's my cyberspace place to post my favorite things...thoughts about family and creativity and design. One of my favorite things is making stuff, specifically clothing and accessories from fiber and metal. So you'll see a lot about that here. I also love spending time with my family, so there will be a bit about that too. When I'm not with my family or in my studio, I am most likely at nextdoor, my store. I have always had a store ever since I was a young woman. I started with a weaving store called the niddy noddy in Waukesha eons ago. I ended with nextdoor in Brookfield. It's my dream store filled with great clothing, especially denim. Really nice women work and shop there, it's a fun place to be. You can find us there every day and online at www.shopatnextdoor.com So come for a visit here and there.
Wednesday, July 31, 2013
Thursday, December 20, 2012
There is Hope
There is HOPE. Today we delivered our gifts to Hope Center in Waukesha. The bags were filled with scarves, hats, gloves and sweaters. Thank you to all of you who purchased our Project Knitway coupons to help make this possible. And thank you for
Shopping at Nextdoor
RRT
Saturday, June 9, 2012
Orange You Glad
Orange...just saying the word makes me happy. It's one of my favorite colors and this season one of the fashionable colors to wear. Thank goodness, after all that grey. Orange is said to be a power color. Some believe it heals and others say it increases your appetite, stimulates enthusiasm and sparks creativity. Whatever the color orange does, I just know I enjoy working with it, wearing it and decorating with it. A few examples...
I recently knit this sweater using different shades of orange. I kept the bright orange yarn throughout the piece & added other shades as I knit. It's a fun sweater to wear with strands of orange & brass beads. The body of the sweater is just your basic rectangle, but I switched it up a bit by knitting triangles for the sleeves, creating an interesting "flutter" sleeve.
This year I decided to carry the color orange throughout my shade gardens in hopes that I will have bright bursts of color well into fall. I planted five hundred of these little flowers and have already been rewarded with a beautiful view. An extra bonus, hummingbirds!
Oh, and yes there I am with my orange jeans and my new orange hair!
Tuesday, May 8, 2012
Conundrum
Conundrum...an intricate and difficult problem. That's what I had on my hands or in my hands with my latest knitting project. I had discovered a simple sketch in an Italian knitting book that both intrigued and confused me. Since everything was in Italian and metrics, I had little to go on except for the sketch, a long rectangle. It was a bit of a shock to this self proclaimed queen of rectangles that there could possibly be one more rectangle that I hadn't already explored or designed. So I took the challenge.
The first part was easy, knit a rectangle 20 inches wide and 100 inches long. I chose to do this on my standard knitting machine, one I hadn't used for sometime. More about that another time. The tricky part was shaping one end at an angle, but I managed to do that by increasing one stitch every row at the beginning. I was quite proud of myself when my piece came out to be a close match to the drawing.
The conundrum developed when I started to "put it together". I made this drawing up for you in color, something I didn't have to begin with. You start by folding the piece and joining the angled end to the side (the black lines being the seam, about 18"). Next you join the "red seams" and then the "blue" seams. Sounds simple but it's quite confusing manipulating this long piece of fabric that wants to curl and twist upon itself. I finally cut out a paper pattern and taped it together to get the idea. I was beginning to think that I might just have a long piece of nothing on my hands when it fell into place. It's an interesting piece with lots of design potential. What you can't see very well from the photo is that it's a combination of a shrug and a poncho, very dramatic. I knit a second one narrower and shorter with also a nice results. The conundrum was solved. RRT
The first part was easy, knit a rectangle 20 inches wide and 100 inches long. I chose to do this on my standard knitting machine, one I hadn't used for sometime. More about that another time. The tricky part was shaping one end at an angle, but I managed to do that by increasing one stitch every row at the beginning. I was quite proud of myself when my piece came out to be a close match to the drawing.
The conundrum developed when I started to "put it together". I made this drawing up for you in color, something I didn't have to begin with. You start by folding the piece and joining the angled end to the side (the black lines being the seam, about 18"). Next you join the "red seams" and then the "blue" seams. Sounds simple but it's quite confusing manipulating this long piece of fabric that wants to curl and twist upon itself. I finally cut out a paper pattern and taped it together to get the idea. I was beginning to think that I might just have a long piece of nothing on my hands when it fell into place. It's an interesting piece with lots of design potential. What you can't see very well from the photo is that it's a combination of a shrug and a poncho, very dramatic. I knit a second one narrower and shorter with also a nice results. The conundrum was solved. RRT
Wednesday, April 25, 2012
What Shawl I Do?
Every woman knows this dilemma. You have an occasion to go to, you have the perfect little sleeveless dress, but you have nothing to wear as a wrap. You head off to the mall or your local boutique for a solution without much success. Of course everyone suggests that if all else fails, carry a shawl. Yes that works. It's easy, it's affordable but... I don't know about you, I never know what to do with the dang thing. It starts up around your shoulders doing its job, but inevitably ends up in the crook of your arms. It hangs there in a tangled mess. You can't move freely, give a hug gracefully or worst of all, hoist your glass without some fringe dangling in the wine. Never mind, RRT Designs to the rescue.
All you need is a lovely long scarf or shawl and a needle and thread. Fold the shawl in half and sew a 6 to 8 inch seam along one edge of the shawl as shown. Of course if you have a sewing machine handy, all the better. That's it, you have your "cape shawl". You'll quickly see that when you put the shawl on it drapes in the back like a cape, sits nicely on your shoulders and hangs gracefully down the front. You can add a pin or a small snap for closure if you like and you're good to go.
Oh and by the way, we have an excellent selection of scarves and shawls at nextdoor. Stop by, pick out your favorite one and we'll even convert it to a cape shawl for you. Shawl we see you?
All you need is a lovely long scarf or shawl and a needle and thread. Fold the shawl in half and sew a 6 to 8 inch seam along one edge of the shawl as shown. Of course if you have a sewing machine handy, all the better. That's it, you have your "cape shawl". You'll quickly see that when you put the shawl on it drapes in the back like a cape, sits nicely on your shoulders and hangs gracefully down the front. You can add a pin or a small snap for closure if you like and you're good to go.
![]() |
| fyi...I sewed with a light thread so you could see the seam. Obviously it would be better to use a matching thread. |
Oh and by the way, we have an excellent selection of scarves and shawls at nextdoor. Stop by, pick out your favorite one and we'll even convert it to a cape shawl for you. Shawl we see you?
Monday, April 9, 2012
Shawl We Dance?
For as long as I can remember, I have loved shawls and scarves. My mother always had one artfully tied around her neck to go with a cute outfit that she no doubt made for herself. And when I discovered weaving, it was a natural item to create on a loom, long and rectangular with fringe. I have made many scarves over the years, woven, knit, crocheted, hand dyed, screen printed,...not to mention the 800 plus "scarves for shelter" with Project Knitway. My interest in scarves seems to be renewed every spring, this year being no exception. It's the perfect addition to brighten up a tee or add a little warmth on a cool evening. Thanks to Hollywood, the popularity of scarves has dramatically increased to the point that everyone is wearing them. It's not uncommon now to see a young woman artfully wrapped in a colorful scarf at the grocery store. Very French! Of course I'm never satisfied until I have added my own twist to the subject, so in the days ahead I'll be sharing some new ideas on scarves and shawls with you. Just to wet your appetite, I have included a few photos of some of my scarves plus a link to my favorite video clip of Glenn Close discussing French women and their scarves in the movie Le Divorce. Enjoy and check back for more on the subject...because we shawl see. RRT
link to clip from Le Divorce (sorry about the beer ad)
Saturday, March 3, 2012
A Perfect Day
I have always said the perfect day for me is a combination of exercise, creativity, relaxation and a good book or movie. So when I returned from my walk, I headed into my studio. Remember my window shades? Well I decided to screen print and stencil some designs on them. It was great fun and I really love the results.
The shades are just velcroed to the glass, so I can take them down at anytime with no difficulty or unsightly mess. The whole printing experience was so much fun that I decided to treat myself to a new toy, a thermofax machine. It promises to be lots of fun, an easy way of making silk screens for more printing projects. So I'll be sharing all that with you soon. Hope you had a perfect day too!
R
Wednesday, February 22, 2012
Shady Lane
Most of the year nature provides all the "window shades" I need in my studio. However, during the winter months some of the windows are exposed more than I like. I've thought of purchasing window blinds but I really didn't want the expense or the permanency of them. I finally came up with a solution that was very simple, versatile and affordable.
I purchased some cotton duck fabric from my local store for $6.00 a yard. It was 60 inches wide so I was able to get 3 - 20 inch panels out of 2 yards, making the cost of each panel $4.00. I hemmed them to fit my window and then sewed 2 velcro tabs to the top back corners. I cut 2 velcro tabs with the sticky backs and applied those to my window. Then i simply hung the panels, no expensive hardware and no messy installation. It was the perfect solution. I can take them down when the greenery is back this spring. I was planning to print or stitch on the panels but I'm enjoying nature's design on them right now.
This has so many applications. The panels could be made out of fun print fabrics. It would so cute in a child's room with appliqued cloth photos sewn on (see my blog on Jet Set). And what about that first apartment with an unsightly view or a dorm room that needs fixing up? There are so many possibilities! Have some fun and make something.
Renotta
Tuesday, February 7, 2012
In the Bag
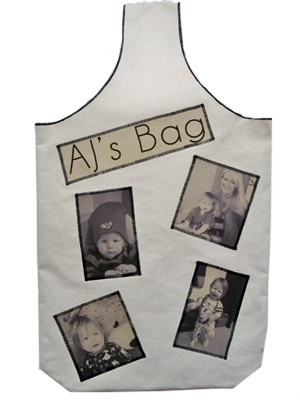
I am really having fun with photo printing on fabric! Made this bag for AJ to take to "school". It's big and roomy enough for all the necessaries, including blankie.
love,
Grannie
love,
Grannie
Monday, February 6, 2012
Pass the Envelope Please
Did I mention I love pillows and that I love to make them. But I hate putting a zipper in. So when I discovered the envelope pillow it was a perfect match for me. Start with a few yards of fabric. I love muslin because it has a hand woven feel and is very affordable.
Step 1: cut a piece of fabric the size of your desired pillow. Mine is 24" by 24". I appliquéd two ink jet printed pieces on to make the pillow top more interesting.
Step 2: Cut 2 pieces of muslin 24" by 18". Hem one right and one left side of each piece along the 24"edge.
Step 3: Lay these pieces right side together onto the pillow top piece and stitch along all 4 sides.
Step 6: Sit back and enjoy. Cost to make: 2 hours of your time and $10. Looks like a million.
Step 1: cut a piece of fabric the size of your desired pillow. Mine is 24" by 24". I appliquéd two ink jet printed pieces on to make the pillow top more interesting.
Step 2: Cut 2 pieces of muslin 24" by 18". Hem one right and one left side of each piece along the 24"edge.
Step 3: Lay these pieces right side together onto the pillow top piece and stitch along all 4 sides.
Step 4: Turn the pillow cover right side out and press. Sometimes I like to top stitch 1/4" along the edge of the piece. It gives the look of a piping and adds a nice touch.
Step 5: Pass the Stuffing Please. You can buy pillow inserts at your local fabric store, but I prefer to make mine. It's quick and easy and inexpensive. You can also get a very nice, plump looking pillow, any size you prefer. Start by sewing a simple pillow sack the same size as your finished pillow top, or even a bit larger. Leave an opening about 6 to 8", large enough to add the stuffing. Add lots of stuffing and spread it evenly into the corners and throughout the sack. Sew up the opening and insert into your pillow top.
Saturday, February 4, 2012
Pillow Talk
I love pillows! Anytime I feel the need to redecorate, the first thing I do is change out my pillows. Sometimes I buy them, but most of the time I make them. It's creative and cost effective, all you need is a few yards of fabric and a bag of stuffing. Lately I have been creating my own "fabric" by adding fabric photos printed on my ink jet printer (refer back to my last blog called Jet Set). It's simple and so much fun. You can print any image onto a piece of fabric and stitch it down to a background piece. Here are a few examples.
![]() |
| I did these for Baby AJ's room. I was thinking how much fun it would be to scan one of his first drawings and make it into a pillow. |
![]() |
| Bobcat was done for a friend in Tucson, who took this photo of a bobcat out in her garden. |
![]() |
| Cat Nap for my friend Ann. |
![]() |
| Leaves of Grass...a fabric photo of a scanned leaf image appliquéd down with stitching continuing the design. |
I'm a big believer in simplicity when it comes to making things and this includes pillows. I like envelope pillows because you can remove the cover from the pillow insert easily. No zippers or closures are required, yet the end result is very professional. In my next blog I'll show you step by step how to do this.
Stay tuned, stick to your knitting and make something today!
Renotta
Wednesday, February 1, 2012
Jet Set
We made it through January here in Wisconsin. It was brutal, but not as bad as other years. Snow fall was minimal, we have yet to have "the big one", the blizzard of 2012. Actually we always enjoy at least one great storm where staying in is your only option while Mother Nature has her way. I always feel like making things in February. Last year at this time I was winding up my "one a day" blog where I created and posted something I made everyday for a year. It was a great challenge that I was happy to be done with, but one that generated lots of ideas. One of my favorite projects that came out of the blog involves printing on fabric with your ink jet printer. It's nothing new, quilters have been doing it for years, but most crafters know nothing about it. Besides being a very creative technique, it is very easy, inexpensive and versatile. All you need are a few basic supplies and an inexpensive ink jet printer, which you no doubt already have.
Supplies Include:
1. A few yards of fabric, natural in color and fiber content. Light weight muslin, linen, silk and blends work well and are available at your local fabric store.
2. A roll of freezer paper from your grocery store.
3. A bottle of Bubble Jet 2000 solution found on line at http://www.dharmatrading.com/cgi-bin/search.cgi?query=bubble+jet
4. Some basic sewing tools like a rotary cutters, scissors, a simple sewing machine (nice to have, but you can get by with needle and thread), a good iron etc.
5. An iron on fusible that fuses fabric to fabric, handy to have and available at your local fabric store.
6. A simple ink jet printer/scanner. I like Canon and Epson.
7. A few hours in your work space, preferably during a snowstorm!
Step 1: Basically you are going to be preparing sheets of fabric for your printer, 8.5" by 11". I start by cutting my fabric in strips about 13"high by whatever the width of the fabric is. I soak these strips in the Bubble Jet Solution following the instructions and hang them to dry.
Step 2: In the meantime I cut my freezer paper into pieces 8.5 X 11.
Step 3: After the fabric has dried, iron on the freezer paper and cut the fabric to fit.
Step 4: The fun begins. You are ready to print. Select a photo or design and place it in your scanner. Put the fabric-paper, one sheet at a time, in your printer and print. You will end up with your image printed on the fabric.
Step 5: Gently peel off the freezer paper. Save the sheet of freezer paper as you can reuse it. Let your fabric sit and cure for awhile.
Step 5: Unleash your creative spirit. The fabric image I show above was taken from a photo of a monarch butterfly in my garden. I printed it and then "framed" it in fabric and stretched it on an antique frame. It is transparent and looks lovely sitting in my window on a cold winter's day.
This is just the tip of the iceberg. There are so many possibilities for this technique...pillows, table runners, window shades, photo albums, note cards etc. I'll be back with more ideas and examples. Stay tuned, create something and stick to your knitting.
Renotta
Supplies Include:
1. A few yards of fabric, natural in color and fiber content. Light weight muslin, linen, silk and blends work well and are available at your local fabric store.
2. A roll of freezer paper from your grocery store.
3. A bottle of Bubble Jet 2000 solution found on line at http://www.dharmatrading.com/cgi-bin/search.cgi?query=bubble+jet
4. Some basic sewing tools like a rotary cutters, scissors, a simple sewing machine (nice to have, but you can get by with needle and thread), a good iron etc.
5. An iron on fusible that fuses fabric to fabric, handy to have and available at your local fabric store.
6. A simple ink jet printer/scanner. I like Canon and Epson.
7. A few hours in your work space, preferably during a snowstorm!
Step 1: Basically you are going to be preparing sheets of fabric for your printer, 8.5" by 11". I start by cutting my fabric in strips about 13"high by whatever the width of the fabric is. I soak these strips in the Bubble Jet Solution following the instructions and hang them to dry.
Step 2: In the meantime I cut my freezer paper into pieces 8.5 X 11.
Step 3: After the fabric has dried, iron on the freezer paper and cut the fabric to fit.
Step 4: The fun begins. You are ready to print. Select a photo or design and place it in your scanner. Put the fabric-paper, one sheet at a time, in your printer and print. You will end up with your image printed on the fabric.
Step 5: Gently peel off the freezer paper. Save the sheet of freezer paper as you can reuse it. Let your fabric sit and cure for awhile.
Step 5: Unleash your creative spirit. The fabric image I show above was taken from a photo of a monarch butterfly in my garden. I printed it and then "framed" it in fabric and stretched it on an antique frame. It is transparent and looks lovely sitting in my window on a cold winter's day.
This is just the tip of the iceberg. There are so many possibilities for this technique...pillows, table runners, window shades, photo albums, note cards etc. I'll be back with more ideas and examples. Stay tuned, create something and stick to your knitting.
Renotta
Sunday, December 25, 2011
Merry Christmas
It is Christmas Day and everything is calm and beautiful. I made it through the busy month at nextdoor and headed for the north woods with my husband and dogs. We're enjoying a quiet and relaxing old fashioned Christmas with hand made gifts and thoughtful acts. Since my husband's birthday is on the 23rd, we always celebrate for three days with lots of good food and good cheer. I thought I'd share some of our gifts and projects with you as my year end post. I start off the holiday season in our home at Thanksgiving time with decorations and a tree. By time Christmas arrives I have enjoyed a month of holiday decor and am ready to leave it behind should we leave home for Christmas. This year though I mentioned that I would miss our little tree, so when we arrived at our cabin this was waiting for me...
Every trip up here we're packed to the hilt with "stuff" from home, this year being no exception. Santa was very agreeable to letting me fill the car with artifacts so I could continue to decorate our cabin. He even gamely stopped at pier 1 in the middle of a snowstorm on the way there. It's amazing how one little purchase can change a space and keep this elf happy.
This lovely little fern painting was just what I was looking for.
So as you can see, we had a down home kind of holiday. It was perfect. One last "homemade" gift I'd like to share with you was for AJ. I started this cloth photo album for him when he was born and finally got around to putting it together. I love the fact that you can print on fabric with your ink jet printer. It's nothing new to quilters, but for the rest of us it seems revolutionary. There are so many fun projects not involving complex techniques and equipment that you can do at home. I'll be sharing these with you in 2012, but in the meantime, just wanted you to see the book.
Happy New Year. Hope you make a resolution to make something in 2012!
Renotta
![]() |
| Score one for Santa! |
![]() |
| Score two for Santa |
So by now you're no doubt wondering what is Santa getting for Christmas? Well, that is always a challenge for the man who says he doesn't want or need a thing. But this little elf had a few tricks up her sleeve, starting with a remote! I proudly produced the long lost remote for the tv so Santa could happily surf from his favorite chair. Also lovingly delivered champagne and well lit fires are a nice touch, as are collage photos framed for this nostalgic Santa. Love photoshop elements!
So as you can see, we had a down home kind of holiday. It was perfect. One last "homemade" gift I'd like to share with you was for AJ. I started this cloth photo album for him when he was born and finally got around to putting it together. I love the fact that you can print on fabric with your ink jet printer. It's nothing new to quilters, but for the rest of us it seems revolutionary. There are so many fun projects not involving complex techniques and equipment that you can do at home. I'll be sharing these with you in 2012, but in the meantime, just wanted you to see the book.
Happy New Year. Hope you make a resolution to make something in 2012!
Renotta
Friday, December 2, 2011
Thank You 30 West!
Today my blog project is a blog project. Lots of people ask me about my studio where I design and work. Up until recently I haven't shown it to anyone outside family and friends, but with this lovely article by 30 West on my scarves for shelter and Project Knitway I decided to share my favorite place with everyone. So I spent a lot of time taking photos and putting them together in photoshop. Then I started yet another blog, RRT Designs and posted it all for you to see. It's a work in progress so I hope you'll come back often for a visit. My next venture is a page on my nextdoor website that features some of my favorite things I make in my studio. It's called Shop What's Next, also a work in progress. In the meantime here's the 30 West Article.
http://www.shopatnextdoor.com/ecommerce/project-knitway.html
Sunday, November 20, 2011
The Daily Monitor
You may be wondering why I'm including this in my project blog about knitting. Well here's the thing, next to designing knitwear and jewelry, I love to decorate. Nothing expensive, just what I can do with Pier I, Target and the like. So when I finally decided AJ was old enough to move upstairs, I decorated Andrea's old room for him. It was really fun to fill it with cute stuff from Target and haul out all Andrea's stuffed animals that I saved all these years. It was great to see the room come back to life. The first time I showed it to AJ he took a walk through and said "all done" and left. The next time went better, so last night when he stayed over I was hoping he was ready for the new space. It actually went well, he slept like a lamb. Me, I was awake all night, not because of AJ but this thing called a monitor. There it was all set up on my night table flashing and blinking away like a beacon. It wasn't till I unplugged it at 4am that I caught a few winks. It's a handy device, one that I'm sure I'll get used to with time. Funny thing about it is that I feel like he's watching me as I watching him. So I'm monitoring AJ and he's monitoring me...the daily monitor.
Thursday, November 10, 2011
The Parallel of this Story
I spend a lot of my time thinking about parallelograms, particularly rectangles. Rectangles are everywhere in life. I'm looking at one right now as I write this blog and you're looking at one as you read this. Not to brag, but I think I'm a rectangle expert. It's only because of my knitting machines and my obsession with designing knit wear on them. I'm always trying to come up with another way to make something from a rectangle. Yes, I can knit other shapes with my machines, squares, triangles, circles of sort, but rectangles are really where it is at. Look at any one of your favorite sweaters, and you'll see it's most likely just a bunch of rectangles put together. Lately I've been making a lot of ponchos from long pieces of knitting. They are just so satisfying to make and honestly I can't keep them in stock in my store. I love watching how the colors unfold and how this simple shape becomes a wonderful garment simply by folding it in half and sewing a few seams. I make them long, short, wide, narrow. I put them together right side out or wrong side out. Some have folded cowl collars and others have v necks. I even made one in green and gold to wear when the Packers play. This fall it's fashionable to wear a poncho...next fall who knows. By then you may be considered a square by the fashionistas. But as for me, I'll still be knitting and wearing my rectangles.
Monday, October 31, 2011
The Heat is On
The heat is on in our homes and most of us feel safe, cozy and warm. But for some less fortunate this is not true. The cold weather ahead doesn't bring visions of sugar plums and family gathered around the fireplace. Instead the cold realty is that many are facing nights ahead on the streets. Last year we started a community project at nextdoor involving our scarves for shelter. We knit and distributed over 200 warm scarves for shelters in Waukesha. I am proud to say that thanks to all our "donations" of yarn by our customers we will be knitting 500 scarves this year. I am also happy to say that we will be donating these scarves via Hope Center in Waukesha. This is a wonderful organization that has been serving basic needs in the community with financial assistance, free food, free clothing and free furniture in the area for almost twenty-five years. Our scarves are distributed through their store. So the heat is on! We are stepping up production in the studio. 500 scarves, 125,000 rows, one scarf at a time. My good friends Ula and June are helping me reach our goal. Because what is life without Hope!
Tuesday, October 18, 2011
I've Gone to the Dogs
We had a great time at the Fashion for Paws show last Friday evening. We unleashed our creative energies, walked the catwalk and took best in show. Nextdoor was doggone gorgeous. All our fur footed friends were also fashionably dressed with my matching knit scarves and ponchos, or should I say poochos. I could probably start a second career with RRT Designs for the Dogs.It was great fun and all for a good paws.
Saturday, July 23, 2011
In the Bag or Get Looped
It's not that I haven't been knitting. I just haven't been blogging about it. So this is the next addition to my fall collection for nextdoor. I knit the bag on my bulky machine using one of my favorite fairisle animal patterns. I lined it with a wool tweed fabric and added tassels and African beads for an ethnic look. I had just enough yarn left over for a continuous scarf with loop fringe. Kind of nice to think about wearing this on a crisp November day, especially lately with all our oppressive hot weather we have been having.
Subscribe to:
Posts (Atom)